Stationing is the fundamental system of measurement used for road layout and construction. The stations are reference points that are placed along the horizontal measurement of a route
centerline or a baseline at some regular interval. Generally, the distance between two adjoining stations along a route is 100 feet. The first station located at the beginning of the baseline is 0+00 and the next station located 100 feet away from it is 1+00. Therefore, a station number of 10+34.05 depicts 1034.05 feet (10*100 + 34.05) away from the starting station.
The station numbers increase from west to east or south to north based on the cardinal direction of the overall highway. For highway projects, a starting reference station is first established and all distances along the route centerline are measured from that point location. You can add event data to routes by entering station numbers in the Add Point Events widget. The station data is translated to routes and measures for storage.
You can use the stationing data as an input for adding linear events by using the following scenarios:
- Create a new station by selecting a point on a route and calculating the measures in the form of station values.
- Identify a starting or base station on the route and input the station values as an offset from that location.
Input the station values by selecting a point on the route
You can use this method when no stations are present on the route. You'll create a station on the route and enter the stationing values for measures.
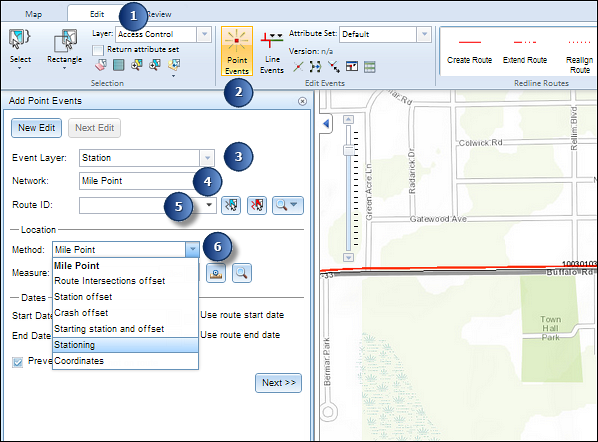
- Open Event Editor and, if prompted, sign in to Portal for ArcGIS or ArcGIS Online.
- Click the Edit tab.
- In the Edit Events group, click the Point Events button
 .
.The Add Point Events widget appears.
If there are no editable point event layers, the widget is disabled.
- Choose an event layer you want to edit from the Event Layer drop-down list.

- Click the Network drop-down arrow and choose the network that will serve as a source linear referencing method (LRM) for defining the input measures for the new events.
The Network is an LRS Network published as a layer in the Event Editor.
You can specify the LRS Network to be used as the LRM for defining the measure of the new point event. The widget accepts an LRS Network as a source to identify the location for adding the new point event. However, when the new point event data is being stored in the database, the app performs an internal translation of measures to always store the measure value in the LRM of the LRS Network with which the event is registered.
- Type a route ID in the Route ID text box on which the new event measure will be based.
Tipp:
You can also click the Select a Route on the Map button
 to select the route on the map.
Hinweis:
If a message appears that is related to acquiring locks, the need to reconcile, or not being able to acquire locks, Roads and Highways conflict prevention is enabled.
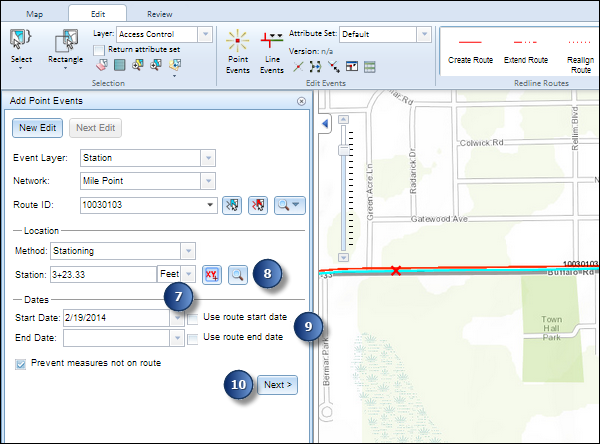
- In the Location section, click the Method drop-down arrow and choose Stationing.

- Select the station location on the map by using any one of the following methods.
- Click the Select a Location on the Map button
 to select the location of the station on a route in the map.
 - Type the station number.
Hinweis:
When typing a station number, specify the route ID.
A yellow star shows the location of the station on a route in the map. The LRM measure equivalent of the location is displayed in Location. For example, if the LRM is mile point, the number of miles at that location will be displayed. The Route ID gets populated.
A red cross appears at the selected location on the map.
- Click the Select a Location on the Map button
- Click the drop-down arrow next to Station and choose the units.
- Provide the Start Date and End Date for the events.
Hinweis:
If you configured your Event Editor instance to not allow dates prior to the start date of the route, and you enter a date prior to the start date of the selected route in Start Date, a warning message appears alerting you to select a date on or after the start date of the selected route.
- Click Next to view the Attribute Value table.
This table contains all the attributes of the event layer.
Hinweis:
Coded value, range domains, and subtypes are supported when configured for any field in the Attribute-Value table.
- Provide attribute information for the new event in the table.
Tipp:
You can click the Copy Attribute Values button
 and click an existing point event belonging to the same event layer on the map to copy event attributes from that point.
 - Check the Show network name check box to see the LRS Network with which the selected event layer is associated.
- Click Save.
A confirmation message appears at the lower right once the newly added point event is saved. The new point is created and appears on the map.
The stationing data is translated to routes and measures for storage.
After an event has been successfully created, you have the following two options to continue characterizing the route:
- Click New Edit to clear all the input entries in the widget and restore the default values from the geodatabase to the attribute table.
- Click Next Edit to retain all the existing entries in the widget and the attribute table for the convenience of quick editing of similar characteristics.
Adding point events by starting station and offset
Point events, such as crashes and traffic count sites, can be added to the geodatabase by offsetting from a station location. The reference offset data is translated to routes and measures for storage.
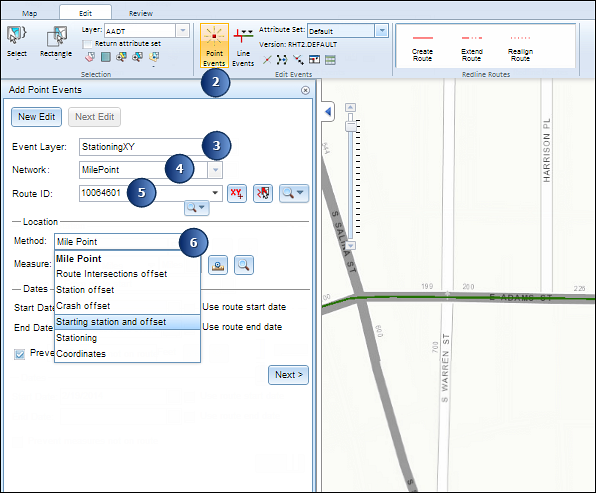
- Open Event Editor and, if prompted, sign in to Portal for ArcGIS or ArcGIS Online.
- Click the Edit tab.
- In the Edit Events group, click the Point Events button
 .
.The Add Point Events widget appears.
If there are no editable point event layers, the widget is disabled.
- Choose an event layer you want to edit from the Event Layer drop-down list.

- Click the Network drop-down arrow and choose the network that will serve as a source linear referencing method (LRM) for defining the input measures for the new events.
The Network is an LRS Network published as a layer in the Event Editor.
You can specify the LRS Network to be used as the LRM for defining the measure of the new point event. The widget accepts an LRS Network as a source to identify the location for adding the new point event. However, when the new point event data is being stored in the database, the app performs an internal translation of measures to always store the measure value in the LRM of the LRS Network with which the event is registered.
- Type the route ID on which the new event measure will be provided in the Route ID text box.
Tipp:
You can also click the Select a Route on the Map button
 to select the route on the map.
Hinweis:
If a message appears that is related to acquiring locks, the need to reconcile, or not being able to acquire locks, Roads and Highways conflict prevention is enabled.
- In the Location section, click the Method drop-down arrow and choose Starting station and offset.
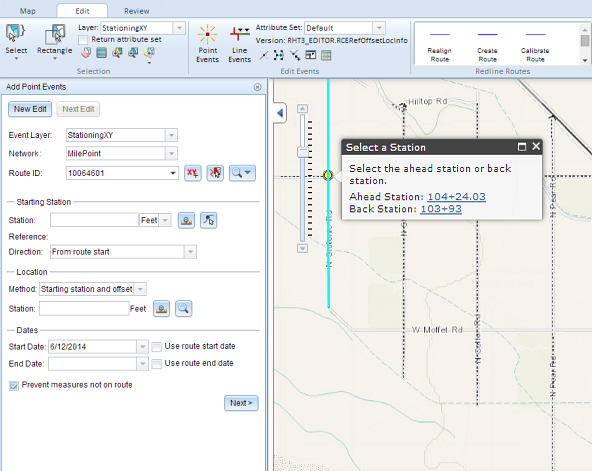
The Starting Station section gets added to the widget.
- Provide the Station value of your starting station using one of the following methods.
- Click the Select a Station on the Map button
 to select the location of the starting station on a route in the map.
A yellow circle shows the location of the starting station on a route in the map. Since the station value for the location contains an equation, a station value picker pops out on the map.

The Route ID and station value of the starting station gets populated by the selection. The units get populated from the station attributes. The LRM measure equivalent of the location is displayed in Location. For example, if the LRM is mile point, the number of miles at that location will be displayed. The direction the station measures increase along the route gets populated.
Hinweis:
This functionality is available only for the networks that contain a stationing event layer.
- Click the Select a Location on the Map button
 and click a location on the selected route. The station value is derived from the map.
A yellow star shows the location of the starting station on a route in the map. The LRM measure equivalent of the location is displayed in Reference. For example, if the LRM is mile point, the number of miles at that location will be displayed. If you did not select a route in step 4, the Route ID will be populated with the route ID associated with the selected station.
- Type the station value.
- Click the Select a Station on the Map button
- Click the drop-down arrow next to Station and choose the units.
- If you chose to type your station value, use the drop-down arrow to select the direction.
This selection indicates the direction the station measures increase along the route.
- In the Location section, provide the station measure by using any one of these methods.
- Click the Select a Location on the Map button
 and click a location on the selected route. The station value is derived from the map.
 - Type the station value.
A red cross symbol appears at the selected location on the map.
- Click the Select a Location on the Map button
- Provide the start and end dates in the Start Date and End Date text boxes.
Hinweis:
If you configured your Event Editor instance to not allow dates prior to the start date of the route, and you enter a date prior to the start date of the selected route in Start Date, a warning message appears alerting you to select a date on or after the start date of the selected route.
- Click Next to view the Attribute Value table.
This table contains all the attributes of the event layer.
Hinweis:
Coded value, range domains, and subtypes are supported when configured for any field in the Attribute-Value table.
- Provide attribute information for the new event in the table.
Tipp:
You can click the Copy Attribute Values button
 and click an existing point event belonging to the same event layer on the map to copy event attributes from that point.
 - Check the Show network name check box to see the LRS Network with which the selected event layer is associated.
- Click Save.
A confirmation message appears at the lower right once the newly added point event is saved. The new point is created and appears on the map.
The stationing data is translated to routes and measures for storage.
After an event has been successfully created, you have the following two options to continue characterizing the route:
- Click New Edit to clear all the input entries in the widget and restore the default values from the geodatabase to the attribute table.
- Click Next Edit to retain all the existing entries in the widget and the attribute table for the convenience of quick editing of similar characteristics.